Roly Poly Penguin Decorations made of Redwood and Acorn
Penguins are a fun and easy critter to make with cones. While not a northern bird, most species enjoy a cold (southern) climate. Did you know that most penguin species have all black or mostly back faces? This is not what people tend to depict in their recreations of them. The white face is just so cute! In this project, we are going to try mixing colors of paint to make our own color for the feet!

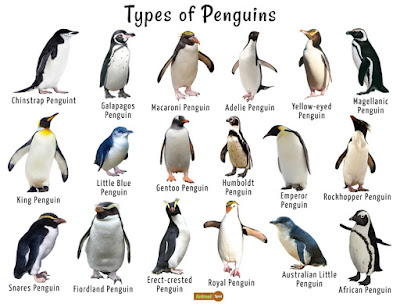
Can you use this chart of 18 penguins to figure out which species I made?
Materials:
scissors
black or white felt pen
ribbon for bow and to hang your penguin from the tree
glue gun and glue
paintbrush
paint pallet or plastic lid or plastic plate
acrylic paint: white , black, red and yellow
optional: oak acorn cap for hat
2 googly eyes
1 acorn (head)
black or white felt pen
ribbon for bow and to hang your penguin from the tree
glue gun and glue
paintbrush
paint pallet or plastic lid or plastic plate
acrylic paint: white , black, red and yellow
optional: oak acorn cap for hat
2 googly eyes
1 acorn (head)
1 round redwood cone (body)
1 long wide scale from a pine cone (for tail)
2 scales from a pine cone (for feet)
2 maple keys (for wings)
Step 1
Collect your materials so they are all nearby.
1 long wide scale from a pine cone (for tail)
2 scales from a pine cone (for feet)
2 maple keys (for wings)
Step 1
Collect your materials so they are all nearby.

Step 2
Prepare the Redwood so the acorn will sit on it.
Use sharp scissors to cut out a depression in the top (narrower) part of the redwood cone.
Prepare the Redwood so the acorn will sit on it.
Use sharp scissors to cut out a depression in the top (narrower) part of the redwood cone.

With the acorn tip pointing forward, try different positions for the acorn to sit flat on it until you find one side that it sits most stable. Do not glue it on yet. The acorn tip becomes the beak.

Step 3
Next, prepare the wings. Cut the seed head off 2 maple keys per penguin.
Next, prepare the wings. Cut the seed head off 2 maple keys per penguin.
Use scissors to trim the wings round.

Paint one side of the wings with black paint. I am making three penguins so I paint 3 pairs of wings. I cut the smaller penguin's wings a little smaller than the others. It helps to pair the wings when you paint them so you paint the correct side of each.

While you are using the black paint, you might as well paint a head and one tail per penguin too. Paint both sides of the tail black.

Step 4
Time to work on the body! Place the head on the body and use a felt marker to mark a vertical line on either side of the body where the black and white will meet. The white area (chest and stomach area) should be just a little less than half the body.

Time to work on the body! Place the head on the body and use a felt marker to mark a vertical line on either side of the body where the black and white will meet. The white area (chest and stomach area) should be just a little less than half the body.
Paint the penguin's back side solid black. Let dry while you do the next step.

Step 5
Clean your brush very well. Here is where we get to experiment with mixing paint.
Squish a single drop of each of red, yellow and white onto a palette. I use a pink neon, daffodil yellow and white in mine. The pink is on the bottom.
Squish a single drop of each of red, yellow and white onto a palette. I use a pink neon, daffodil yellow and white in mine. The pink is on the bottom.

Mix the three colors together with your brush. You do not need to dilute it unless you think the color is too intense. Diluting it gives it a washed effect. Paint both sides of the pairs of pine cone scales that will become the feet of your penguin. It's almost a pastel peach color!

Step 6
Wash your brush well again. This time, use white paint to paint the chest and stomach of the body.
Wash your brush well again. This time, use white paint to paint the chest and stomach of the body.
Now paint the undersides of the wings white too. Let them dry.

Once the white paint is dry, flip the wings over to check to see if any white got on the black wings. If so, you can either use the felt marker to color over the white or repaint small sections of them with black.

Step 7
Now glue the head onto the body, making sure the tip of the acorn (beak) is facing forward over the chest. For a more jaunty look you can turn the head.

Now glue the head onto the body, making sure the tip of the acorn (beak) is facing forward over the chest. For a more jaunty look you can turn the head.
Step 8
Position the feet facing forward under the body and the tail on the back of the body. The three together should create a stable triangle that the penguin can sit up on his own. Glue them in place once you have found a stable position. If you find they are unstable once they are dry, take them off, remove the glue and try again. This is important of you want your penguin to stand on his own. If you are planning to hang him as a tree ornament, then it doesn't matter if he can stand up.

Position the feet facing forward under the body and the tail on the back of the body. The three together should create a stable triangle that the penguin can sit up on his own. Glue them in place once you have found a stable position. If you find they are unstable once they are dry, take them off, remove the glue and try again. This is important of you want your penguin to stand on his own. If you are planning to hang him as a tree ornament, then it doesn't matter if he can stand up.
Here you can see both the feet and the tail and that the penguin can stand on his own. Note the tail is turned so there is a space between the middle of the tail and the table top.

Step 9
Add the wings. Place the wings black side up and the straighter edge forward. The top of the wings should be about the penguin's shoulder height.
Add the wings. Place the wings black side up and the straighter edge forward. The top of the wings should be about the penguin's shoulder height.
Here's a penguin from the back showing the wings, tail and a peek of the feet.

I glued his feet wider apart and wings so it looks like he's falling over and trying to rebalance, as a youngster might do.
I also decided I wanted to paint a white face on at least one of my penguins. An upside down heart did the trick! It IS really cute! His eyes and tiny beak are more noticeable. Compare this new face to the photo below. That was how I originally painted him. See how his eyes look too small and his beak disappears with the all black face?

Step 10
Decorate your penguins with ribbons! Give them a hat. You can paint the eyes on or use googly eyes. Attach a ribbon to the back side of the body if you plan to hang your penguin on the tree. Glue it in at least two places along the string for strength.

Decorate your penguins with ribbons! Give them a hat. You can paint the eyes on or use googly eyes. Attach a ribbon to the back side of the body if you plan to hang your penguin on the tree. Glue it in at least two places along the string for strength.
Have fun!


